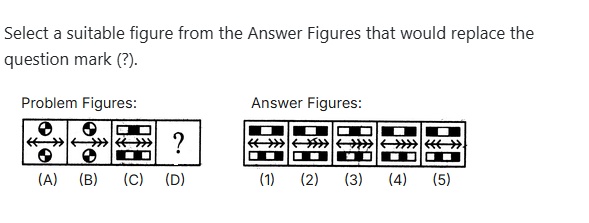
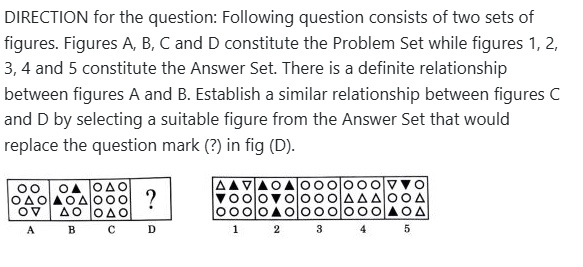
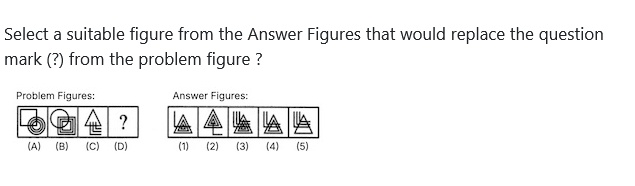
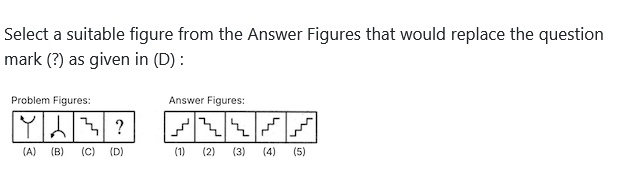
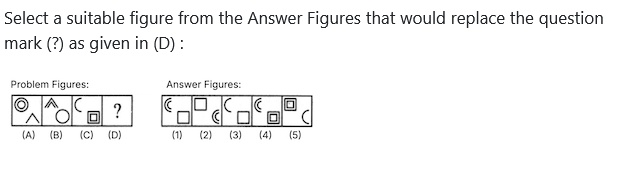
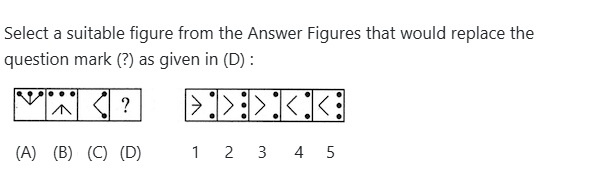
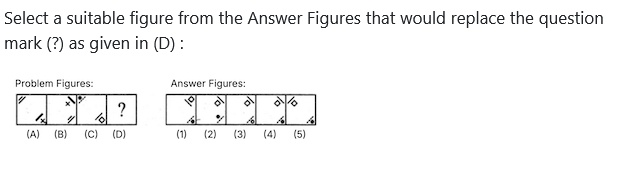
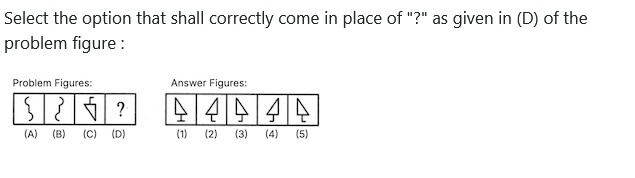
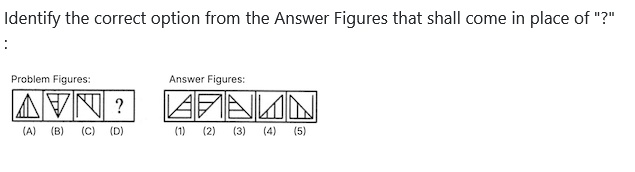
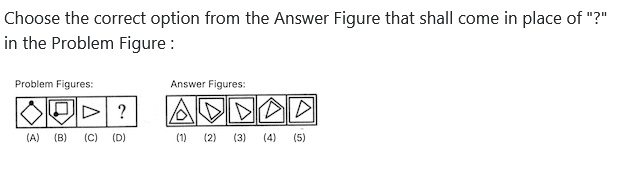
Select a suitable figure from the Answer Figures that would replace the question mark (?).
- A1
- B2
- C3
- D4
- E5
Show answerHide answer
Official CET key: B · Cetking's answer: C — see why below
Approach: Figure analogy: Fig A → Fig B rule applied to Fig C → Fig D.
Solution:
Arrow: A has 2 heads at each end; B has 1 head on the left and 3 on the right ⇒ one arrowhead moves from the left end to the right end.
Top and bottom elements: their black and white parts swap (shading is reversed).
C: top bar white-black-white, bottom bar black-white-black-white, arrow 2 heads left, 3 heads right.
So D: top bar black-white-black, bottom bar white-black-white-black, arrow 1 head left, 4 heads right ⇒ Answer Figure 2.
Why the other options are wrong:
Figure 1: arrow still has 2 heads on the left.
Figure 3: top bar not reversed.
Figure 4: bottom bar not reversed.
Figure 5: 3 heads on the left — the head moved the wrong way.
Cetking shortcut: Check the arrow first (1 left, 4 right) — it leaves only 2, 3, 4; then the reversed bars pick 2.
Answer: B
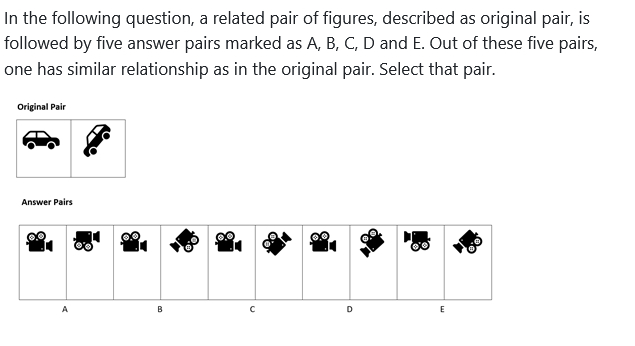
In the following question, a related pair of figures, described as original pair, is followed by five answer pairs marked as A, B, C, D and E. Out of these five pairs, one has similar relationship as in the original pair. Select that pair.
- AA
- BB
- CC
- DD
- EE
Show answerHide answer
Answer: D ✓ official key
Approach: Track two features: where the front points and which side the wheels are on.
Solution:
Original car: front (bonnet) → right, wheels → down, roof → up.
Second car: front → down-left, wheels → down-right, roof → up-left.
A pure rotation that sends 'right' to 'down-left' would send 'down' to 'up-left' — but the wheels go to down-right. So the car is mirrored and then tilted.
Apply the same to the camera (lens → right, reels → up): lens → down-left, reels → up.
Pair D shows exactly this: reels on top, lens pointing down-left.
Why the other options are wrong:
A: plain upside-down (water) image. B, C, E: pure rotations — the lens and reels keep their original clockwise order.
Cetking shortcut: Check two features; if no single rotation moves both correctly, a flip is involved.
Answer: D
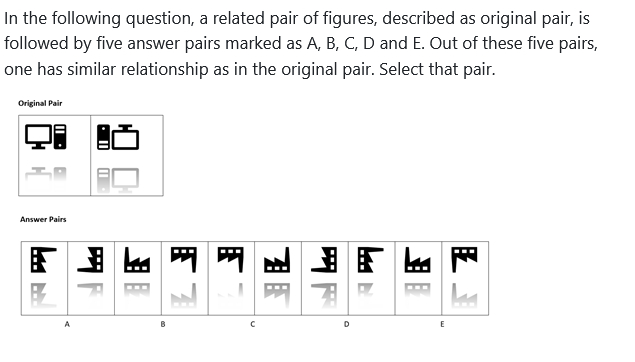
In the following question, a related pair of figures, described as original pair, is followed by five answer pairs marked as A, B, C, D and E. Out of these five pairs, one has similar relationship as in the original pair. Select that pair.
- AA
- BB
- CC
- DD
- EE
Show answerHide answer
Official CET key: C · Cetking's answer: B — see why below
Approach: Compare the top figure of each pair and its faded reflection below.
Solution:
In the original pair the second figure is the first one turned upside down (monitor inverted, tower slots moved to the bottom), shown with its own faded water reflection beneath.
The official key takes pair C: the first factory is inverted (windows on top, chimney hanging down) and the second factory is the same figure the right way up — the inverted (water) image of the first, again with its own reflection.
Note: In the original pair the tower and monitor also swap sides, so the second figure is a 180° rotation of the first. By that strict reading, pairs A, B and D are 180° rotations, while C and E are only vertical flips, so no single option matches uniquely. The official key is C.
Answer: C
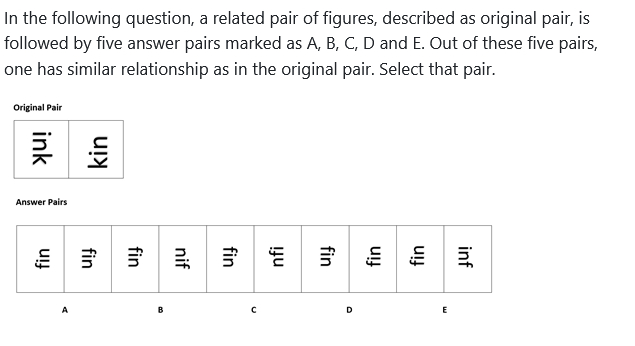
In the following question, a related pair of figures, described as original pair, is followed by five answer pairs marked as A, B, C, D and E. Out of these five pairs, one has similar relationship as in the original pair. Select that pair.
- AA
- BB
- CC
- DD
- EE
Show answerHide answer
Answer: C ✓ official key
Approach: Read the letters of each figure and note the turn.
Solution:
Original: 'ink' → 'kin'. The last letter (k) moves to the front, and the word is turned through 180°.
Apply to 'fin': last letter n moves to the front → 'nfi', turned through 180° relative to the first figure.
Pair C shows 'fin' and 'nfi' with exactly this 180° turn.
Why the other options are wrong:
A, D: only the turn, letters unchanged ('fin').
B: letters reversed ('nif'), not shifted.
E: first letter moved to the end ('inf') — the opposite shift.
Cetking shortcut: Settle the letter change first (ink → kin = last to front); only one option has 'nfi'.
Answer: C
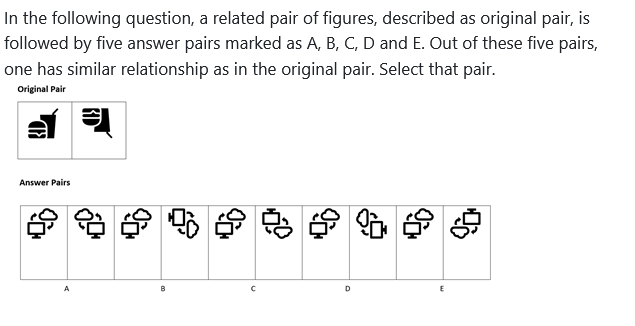
In the following question, a related pair of figures, described as original pair, is followed by five answer pairs marked as A, B, C, D and E. Out of these five pairs, one has similar relationship as in the original pair. Select that pair.
- AA
- BB
- CC
- DD
- EE
Show answerHide answer
Official CET key: C · Cetking's answer: B — see why below
Approach: Find the transformation from the first to the second figure.
Solution:
Original: burger bottom-left, cup on the right with the straw pointing up → second figure: burger top-left, cup inverted with the straw pointing down. Left–right stays the same; top and bottom swap → water image (vertical flip).
Answer pairs start with: monitor bottom-left, cloud top-right.
Water image → monitor top-left (stand on top), cloud bottom-right (upside down). This is pair C.
Why the other options are wrong:
A: left–right mirror. B, D: 90° turns. E: 180° rotation (monitor moves to the right).
Answer: C
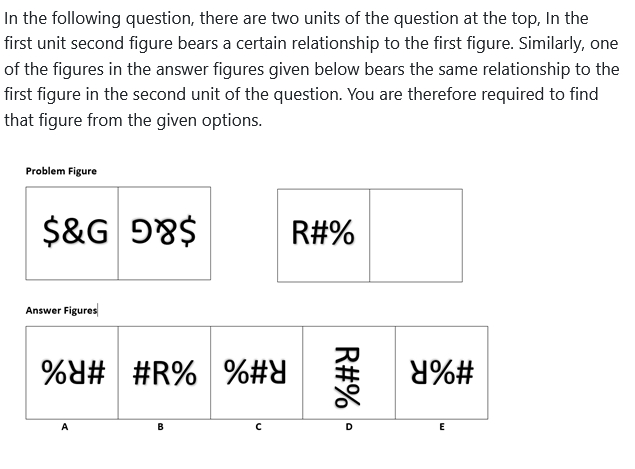
In the following question, there are two units of the question at the top, In the first unit second figure bears a certain relationship to the first figure. Similarly, one of the figures in the answer figures given below bears the same relationship to the first figure in the second unit of the question. You are therefore required to find that figure from the given options.
- AA
- BB
- CC
- DD
- EE
Show answerHide answer
Answer: C ✓ official key
Approach: Find how '$&G' changes, then apply it to 'R#%'.
Solution:
'$&G' → the second figure shows G first and $ last, with every symbol upside down: the whole figure is turned through 180°.
Turn 'R#%' through 180°: the order becomes % # R, with R upside down.
This is option C.
Why the other options are wrong:
A, B, E: change the order of the symbols (e.g. '#R%'). D: turned through 90°, not 180°.
Answer: C
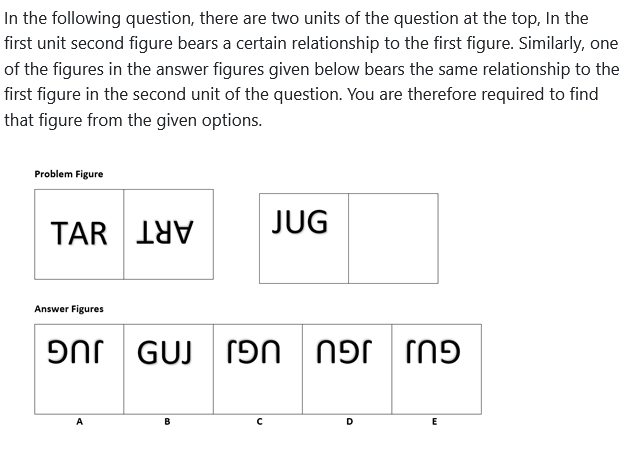
In the following question, there are two units of the question at the top, In the first unit second figure bears a certain relationship to the first figure. Similarly, one of the figures in the answer figures given below bears the same relationship to the first figure in the second unit of the question. You are therefore required to find that figure from the given options.
- AA
- BB
- CC
- DD
- EE
Show answerHide answer
Official CET key: C · Cetking's answer: B — see why below
Approach: Find the letter change, then the turn.
Solution:
'TAR' → the second figure, turned through 180°, reads 'ART': the first letter T moves to the end, and the word is turned upside down (180°).
Apply to 'JUG': J moves to the end → 'UGJ'; turn it through 180°.
Option C is 'UGJ' turned through 180°.
Why the other options are wrong:
A: 'JUG' itself turned 180° — no letter shift. B: reversed order 'GUJ'. D, E: other letter orders turned upside down.
Cetking shortcut: Turn the page in your head — the options read upright as UGJ only in C.
Answer: C
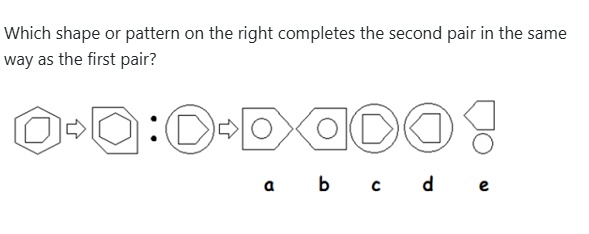
Which shape or pattern on the right completes the second pair in the same way as the first pair?
- Aa
- Bb
- Cc
- Dd
- Ee
Show answerHide answer
Answer: B ✓ official key
Approach: Outer and inner shapes swap, and the shape that becomes the outer one is mirrored.
Solution: Pair 1: hexagon (outer) with a clipped square inside → clipped square becomes the outer shape (mirrored, cut corners switch sides) and the hexagon goes inside.
Pair 2: circle (outer) with a pentagon pointing right → the pentagon becomes the outer shape, mirrored to point left, with the circle inside.
Option b shows a left-pointing pentagon with a circle inside.
Why the other options are wrong: a keeps the pentagon pointing right; c and d keep the circle as the outer shape; e separates the two shapes.
Cetking shortcut: In outer/inner analogies, check the swap first, then any flip.
Answer: B
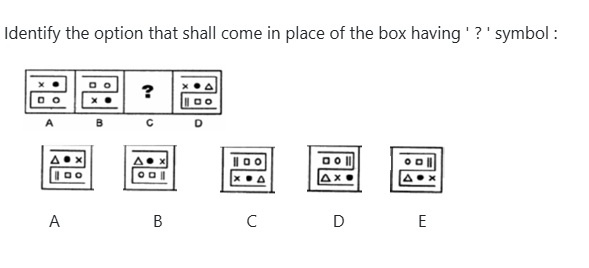
Identify the option that shall come in place of the box having ' ? ' symbol :
- AA
- BB
- CC
- DD
- EE
Show answerHide answer
Answer: C ✓ official key
Approach: Analogy A : B :: C : D – the top and bottom compartments swap contents.
Solution: A: top × ●, bottom □ ○. B: top □ ○, bottom × ● – the contents swap.
D: top × ● △, bottom || □ ○. So C must be D before the swap: top || □ ○, bottom × ● △.
Option C matches.
Why the other options are wrong: A and B keep × ● △ on top; D and E change the order of the symbols within a row.
Cetking shortcut: Work backwards from D using the same swap.
Answer: C
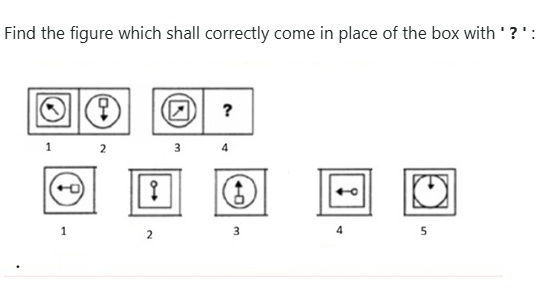
Find the figure which shall correctly come in place of the box with ' ? ' :
- A1
- B2
- C3
- D4
- E5
Show answerHide answer
Official CET key: D · Cetking's answer: A — see why below
Approach: Analogy 1 : 2 :: 3 : 4 – the inner shape becomes the outer one, the outer shape becomes the arrow's tail, and the arrow turns 135° anticlockwise.
Solution: Fig 1: square (outer), circle (inner), arrow pointing up-left. Fig 2: circle becomes the frame, the square becomes the arrow's tail, the arrow points down (135° anticlockwise).
Fig 3: circle (outer), square (inner), arrow pointing up-right.
Fig 4: the square becomes the frame, the circle becomes the tail, and the arrow turns 135° anticlockwise → pointing left.
Option 4: square frame, arrow pointing left with a circle tail.
Why the other options are wrong: 1 has the wrong frame (circle) and tail (square); 2 and 3 have vertical arrows; 5 has no tail.
Cetking shortcut: First decide the frame (square) and tail (circle): only 2 and 4 remain; then check the arrow direction.
Answer: D
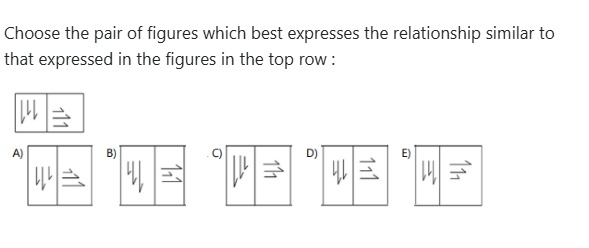
Choose the pair of figures which best expresses the relationship similar to that expressed in the figures in the top row :
- AA
- BB
- CC
- DD
- EE
Show answerHide answer
Official CET key: C · Cetking's answer: B — see why below
Approach: Figure analogy: the first figure turns 90° anticlockwise to become the second, and the order of the line lengths follows the same pattern.
Solution: Top pair: three vertical lines with barbs pointing down → three horizontal lines with barbs pointing right (a 90° anticlockwise turn). The lengths of the lines and the sides of the barbs follow the same pattern.
In option C the vertical group again becomes a horizontal group pointing right, with the same pattern of line lengths and barb sides as the top pair.
Why the other options are wrong: A changes the barb positions; B and D change the order of the line lengths; E has only two horizontal lines, so one element is lost.
Cetking shortcut: Check the number of lines first (E fails), then the arrow direction, then the order of lengths.
Answer: C
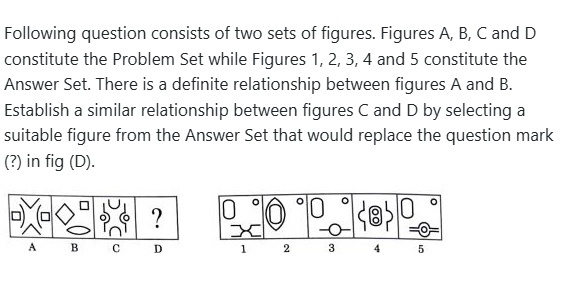
Following question consists of two sets of figures. Figures A, B, C and D constitute the Problem Set while Figures 1, 2, 3, 4 and 5 constitute the Answer Set. There is a definite relationship between figures A and B. Establish a similar relationship between figures C and D by selecting a suitable figure from the Answer Set that would replace the question mark (?) in fig (D).
- A1
- B2
- C3
- D4
- E5
Show answerHide answer
Answer: C ✓ official key
Approach: Figure analogy — every PAIR of matching parts in A merges into ONE part in B.
Solution:
A → B: the two V's (top and bottom) join into a diamond; the two curved brackets join into a lens/oval at the bottom; the two small squares become one square at top-right.
C: the ∪ and ∩ join into a rounded rectangle (left); the two small circles become one circle (top-right); the two side lines join into one horizontal line at the bottom, keeping the circle where they met.
Figure 3 shows rounded rectangle + one small circle at top-right + a line with a circle at the bottom.
Why the other options are wrong:
1: keeps the crossing lines unmerged. 2: puts the oval inside an extra shape and loses the bottom line. 4: keeps brackets/circles separate. 5: doubles the line and circle.
Answer: C
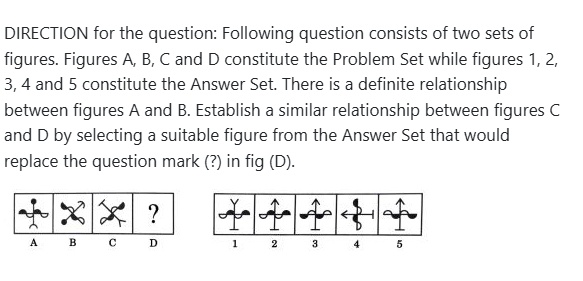
DIRECTION for the question: Following question consists of two sets of figures. Figures A, B, C and D constitute the Problem Set while figures 1, 2, 3, 4 and 5 constitute the Answer Set. There is a definite relationship between figures A and B. Establish a similar relationship between figures C and D by selecting a suitable figure from the Answer Set that would replace the question mark (?) in fig (D).
- A1
- B2
- C3
- D4
- E5
Show answerHide answer
Answer: A ✓ official key
Approach: Figure analogy — count-based change: the number of triangles doubles and half of them turn black.
Solution:
A: 5 circles + 2 white triangles (7 symbols).
B: 3 circles + 4 triangles (2 black, 2 white) — two circles became triangles; triangles doubled 2 → 4, and 2 of the 4 are black.
C: 7 circles + 2 white triangles (9 symbols).
D should have: 4 triangles (2 black + 2 white) and 5 circles.
Figure 1: Δ ▲ ∇ / ▼ ○ ○ / ○ ○ ○ ⇒ 4 triangles (2 black, 2 white), 5 circles ✓.
Why the other options are wrong:
2: 4 triangles but all black. 3: no triangles. 4: 3 white triangles, none black. 5: 5 triangles.
Cetking shortcut: When symbols just look 'reshuffled', count each symbol type and colour in A and B — the counts usually carry the rule.
Answer: A
DIRECTION for the question: Following question consists of two sets of figures. Figures A, B, C and D constitute the Problem Set while figures 1, 2, 3, 4 and 5 constitute the Answer Set. There is a definite relationship between figures A and B. Establish a similar relationship between figures C and D by selecting a suitable figure from the Answer Set that would replace the question mark (?) in fig (D).
- A1
- B2
- C3
- D4
- E5
Show answerHide answer
Answer: B ✓ official key
Approach: Figure analogy — the cross-bar and the wavy line rotate by different amounts, and the fork end becomes an arrow.
Solution:
A → B: the wavy line turns 45° clockwise (its black end goes from left to top-left, white end from right to bottom-right).
The straight bar turns 135° anticlockwise (ball: top → bottom-left; forked end: bottom → top-right) and the fork becomes an arrow-head.
C: bar from top-left (T-end) to bottom-right (fork); wavy line from bottom-left (white end) to top-right (black end).
Apply the rule: wavy line 45° clockwise ⇒ horizontal, white end left, black end right. Bar 135° anticlockwise ⇒ vertical, fork (now arrow) at top, T-end at bottom.
Figure 2 matches: vertical bar with arrow up and T-base, horizontal wave with black hump at the right end.
Why the other options are wrong:
1: fork not changed into an arrow. 3 and 5: wave colours on the wrong ends. 4: bar horizontal and wave vertical — the rotation is wrong.
Cetking shortcut: Track one marked end of each element (black end, fork end) rather than the whole figure.
Answer: B
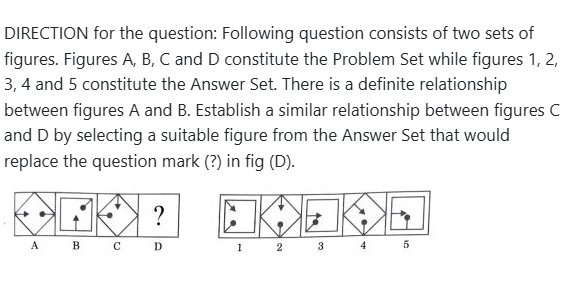
DIRECTION for the question: Following question consists of two sets of figures. Figures A, B, C and D constitute the Problem Set while figures 1, 2, 3, 4 and 5 constitute the Answer Set. There is a definite relationship between figures A and B. Establish a similar relationship between figures C and D by selecting a suitable figure from the Answer Set that would replace the question mark (?) in fig (D).
- A1
- B2
- C3
- D4
- E5
Show answerHide answer
Answer: E ✓ official key
Approach: Figure analogy — the whole figure rotates 90° anticlockwise and black ↔ white.
Solution:
A: top black dot, left white rectangle, right white triangle, bottom black trapezium.
Rotate 90° anticlockwise: top→left, left→bottom, bottom→right, right→top; then swap colours.
B: left white dot, bottom black rectangle, right white trapezium, top black triangle ✓.
C: top white parallelogram, left black triangle (pointing in), right black dot, bottom white pentagon.
Rotate + swap ⇒ left black parallelogram, bottom white triangle (pointing up, towards the circle), right black pentagon, top white dot.
Figure 5 matches.
Why the other options are wrong:
1: colours swapped but the figure is not rotated. 2: bottom triangle points away from the circle. 3 and 4: the dot stays black, so colours are not swapped.
Cetking shortcut: Track one element (e.g., the dot): top → left and black → white; then check the rest only in the surviving options.
Answer: E
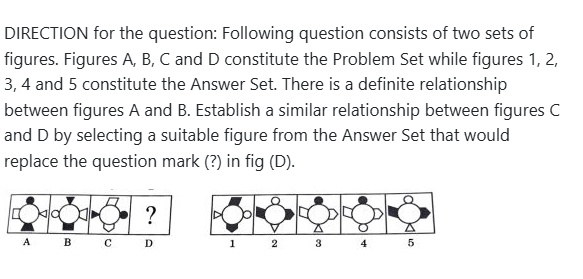
DIRECTION for the question: Following question consists of two sets of figures. Figures A, B, C and D constitute the Problem Set while figures 1, 2, 3, 4 and 5 constitute the Answer Set. There is a definite relationship between figures A and B. Establish a similar relationship between figures C and D by selecting a suitable figure from the Answer Set that would replace the question mark (?) in fig (D).
- A1
- B2
- C3
- D4
- E5
Show answerHide answer
Answer: C ✓ official key
Approach: Figure analogy — the frame turns 45°, the arrow moves 90° anticlockwise and the dot-line moves 45° anticlockwise.
Solution:
A → B: the diamond frame becomes an upright square (45° turn).
Arrow: from the left point (pointing in) to the bottom side (pointing in) — 90° anticlockwise.
Dot-line: from towards the right point to towards the top-right corner — 45° anticlockwise.
C: arrow from the top point, dot-line towards the left point.
D: upright square; arrow 90° anticlockwise ⇒ from the left side pointing right; dot-line 45° anticlockwise ⇒ towards the bottom-left corner.
Figure 3 matches.
Why the other options are wrong:
1: arrow comes from the top-left corner. 2 and 4: frame is still a diamond. 5: dot-line goes straight down, not to the corner.
Cetking shortcut: Settle the frame first (must be an upright square) — that removes 2 and 4 at once.
Answer: C
Select a suitable figure from the Answer Figures that would replace the question mark (?) from the problem figure ?
- A(1)
- B(2)
- C(3)
- D(4)
- E(5)
Show answerHide answer
Answer: A ✓ official key
Approach: Figure analogy A : B :: C : D — the two shapes swap places, the single shape becomes multi-layered and the multi-layered shape becomes single.
Solution:
A: single square (top-left) + nested circles (bottom-right).
B: single circle (top-left) + nested squares (bottom-right) — shapes swapped, "single" ↔ "nested".
C: single triangle (top) + nested L-lines (bottom-right).
So D: single L-line on the left + nested triangles — this is figure (1).
Why the other options are wrong:
(2): the single L sits below the triangle instead of at the left.
(3), (4): the L-lines are still multiple.
(5): the triangle part is not nested.
Cetking shortcut: Count layers: whatever had several layers must end with one, and vice versa.
Answer: A
Select a suitable figure from the Answer Figures that would replace the question mark (?) as given in (D) :
- A(1)
- B(2)
- C(3)
- D(4)
- E(5)
Show answerHide answer
Answer: A ✓ official key
Approach: Figure analogy: B is the water image (top-bottom flip) of A, so D is the water image of C.
Solution:
A: Y-shape with a curved arrow on the left arm at the top.
B: the same shape upside down, arrow still on the left — a vertical flip, not a rotation.
C: staircase going down from top-left to bottom-right, starting with a horizontal stroke at top-left and ending with a vertical stroke at bottom-right.
Water image: staircase rising from bottom-left to top-right, horizontal stroke at bottom-left, vertical stroke ending at top-right → figure (1).
Why the other options are wrong:
(2), (3): same direction as C (not flipped).
(4): starts with a vertical stroke at bottom-left.
(5): ends with a horizontal stroke at top-right.
Cetking shortcut: Left stays left in a water image; only the end strokes change from top to bottom.
Answer: A
Select a suitable figure from the Answer Figures that would replace the question mark (?) as given in (D) :
- A(1)
- B(2)
- C(3)
- D(4)
- E(5)
Show answerHide answer
Answer: B ✓ official key
Approach: Figure analogy: the two elements swap corners (top-left ↔ bottom-right) and the double-lined element becomes single while the single one becomes double.
Solution:
A: double circle (top-left), single caret (bottom-right).
B: double caret (top-left), single circle (bottom-right).
C: single arc "C" (top-left), double square (bottom-right).
D: single square at top-left, double arc at bottom-right → figure (2).
Why the other options are wrong:
(1), (4): double arc stays top-left.
(3): both elements single.
(5): square stays double.
Answer: B
Select a suitable figure from the Answer Figures that would replace the question mark (?) as given in (D) :
- A1
- B2
- C3
- D4
- E5
Show answerHide answer
Answer: C ✓ official key
Approach: Figure analogy: dots stay where they are; the line figure joining them detaches, turns 180° and moves to the opposite side.
Solution:
A: three dots at the top joined by lines meeting below them.
B: same three dots; the line figure is now an inverted "^" at the bottom, not touching the dots.
C: two dots on the right joined by a "<" shape.
D: two dots stay on the right; the "<" detaches and turns into ">" on the left → figure (3).
Why the other options are wrong:
(1): extra middle stroke (arrow).
(2), (5): three dots instead of two.
(4): "<" not inverted.
Answer: C
Select a suitable figure from the Answer Figures that would replace the question mark (?) as given in (D) :
- A(1)
- B(2)
- C(3)
- D(4)
- E(5)
Show answerHide answer
Answer: B ✓ official key
Approach: Figure analogy: the top-left element moves to the bottom-right unchanged; the bottom-right element moves to the top-right and is mirrored (its two parts change order and the line tilts the other way).
Solution:
A: "//" at top-left; thick line + "×" at bottom-right.
B: "//" now at bottom-right (unchanged); "× \" at top-right (mirrored).
C: dot + line at top-left; line + diamond at bottom-right.
D: dot + line at bottom-right (unchanged); diamond + "\" at top-right → figure (2).
Why the other options are wrong:
(1): diamond group not mirrored, and placed wrongly.
(3), (4): dot sits on the wrong side of the line at bottom-right.
(5): diamond group at top-left.
Cetking shortcut: Check the unchanged element first — only (2) keeps "dot then line" exactly as in C.
Answer: B
Select the option that shall correctly come in place of "?" as given in (D) of the problem figure :
- A(1)
- B(2)
- C(3)
- D(4)
- E(5)
Show answerHide answer
Answer: B ✓ official key
Approach: Figure analogy: B is the water image (top-bottom flip) of A, so D is the water image of C.
Solution:
A → B: the S-curve is flipped top to bottom (it becomes a reversed S).
C: triangle pointing down with its vertical side on the right; a hook on top whose short arm points right.
Water image: triangle pointing up, vertical side still on the right; hook at the bottom with the short arm still pointing right (an "L").
Figure (2) matches.
Why the other options are wrong:
(1), (3), (5): vertical side of the triangle on the left (left-right also flipped).
(4): hook arm turned the other way ("J").
Cetking shortcut: In a water image the left/right side of every feature is preserved — check which side the vertical edge is on.
Answer: B
Identify the correct option from the Answer Figures that shall come in place of "?" :
- A(1)
- B(2)
- C(3)
- D(4)
- E(5)
Show answerHide answer
Answer: A ✓ official key
Approach: Figure analogy: the figure is flipped top-to-bottom and the internal hatching changes from vertical to horizontal.
Solution:
A: upright triangle with vertical lines in its left part.
B: the triangle flipped (pointing down), lines still on the left but now horizontal.
C: frame (left side, top, right side) with a diagonal from top-left to bottom-right and vertical lines in the upper-right part.
Flip C: frame opens at the top, diagonal runs from bottom-left to top-right, lines move to the lower-right part and become horizontal → figure (1).
Why the other options are wrong:
(2): diagonal and frame not flipped.
(3): diagonal still top-left to bottom-right.
(4), (5): lines remain vertical.
Cetking shortcut: First eliminate options keeping vertical lines (4, 5) — the line-direction switch is the easiest check.
Answer: A
Choose the correct option from the Answer Figure that shall come in place of "?" in the Problem Figure :
- A(1)
- B(2)
- C(3)
- D(4)
- E(5)
Show answerHide answer
Answer: C ✓ official key
Approach: Figure analogy: the shape goes inside a new outer shape having one more side, and the inner shape is turned by 45°; any dot travels with the shape (C has no dot).
Solution:
A: square standing on a corner (4 sides) → B: the square, turned upright, sits inside a 5-sided outer figure.
C: triangle (3 sides) → D: the triangle, turned, sits inside a 4-sided outer figure (square).
Options 3 and 5 have a square outside a triangle; in 3 the triangle is turned the same way the square turned in A → B.
Answer: figure 3.
Why the other options are wrong:
1: outer triangle, inner pentagon — reversed.
2, 4: outer figure has 5 sides (should be 4).
5: square outside, but the triangle is turned the other way.
Cetking shortcut: Count sides: outer = inner + 1. That leaves only two options; then check the turn.
Answer: C
Find the figure from the Answer Figure that will replace the question mark (?) from the Problem Figure :
- A1
- B2
- C3
- D4
- E5
Show answerHide answer
Answer: A ✓ official key
Approach: Figure analogy: the two shapes swap positions, and the double-outlined shape becomes single while the single shape becomes double.
Solution:
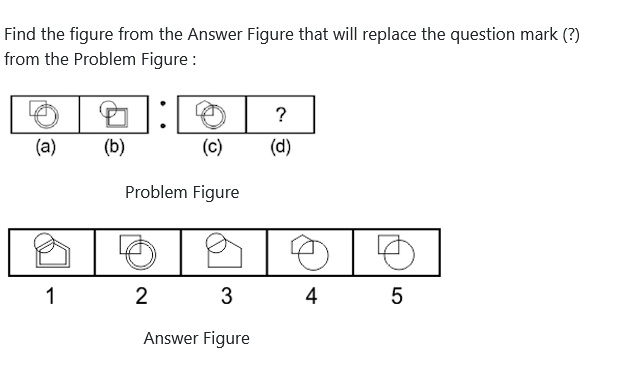
(a): single square (top-left) + double circle (bottom-right).
(b): single circle (top-left) + double square (bottom-right).
(c): single pentagon (top-left) + double circle (bottom-right).
(d): single circle (top-left) + double pentagon (bottom-right) → figure 1.
Why the other options are wrong:
2: square instead of pentagon, no swap.
3: pentagon single.
4: no swap, both single.
5: square, both single.
Answer: A
Select a suitable figure from the Answer Figures that would replace the question mark (?) as given in (D) :
- A(1)
- B(2)
- C(3)
- D(4)
- E(5)
Show answerHide answer
Answer: A ✓ official key
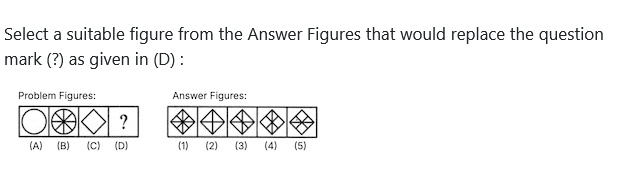
Approach: Figure analogy: B is A with 4 lines through the centre (vertical, horizontal and both diagonals) — 8 spokes.
Solution:
A: plain circle → B: circle with vertical, horizontal and two diagonal lines through the centre.
C: plain diamond → D: diamond with vertical, horizontal and two diagonal lines through the centre → figure (1).
Why the other options are wrong:
(2): only 2 lines.
(3): one of the spokes is missing (incomplete diagonal).
(4): missing the horizontal line.
(5): missing the vertical line.
Answer: A
Given below is a set of picture, the first of which is named, A, B, C, and D respectively. Pictures A and B share a certain relationship. Ascertain from the second set of pictures that are numbered, 1, 2, 3, 4 and 5, which image when put in place of box D, will continue the same relationship between C and D as is seen between A and B :
- A1
- B2
- C3
- D4
- E5
Show answerHide answer
Answer: C ✓ official key
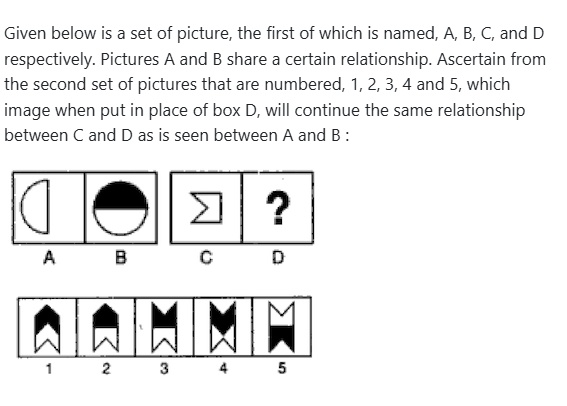
Approach: Figure analogy — rotate, shade, then add a mirror-image copy.
Solution:
A → B: the half-circle (curve left, flat right) is rotated 90° clockwise so the curve is on top, shaded black, and its white mirror image is added below the flat edge, making a full circle.
Apply to C: the notched shape (notch on the left, flat on the right) rotated 90° clockwise has the notch on top and the flat edge at the bottom; shade it black.
Add its white mirror image below: a white part with the notch at the bottom.
Figure 3 shows exactly this: black top with a notch on top, white bottom with a notch at the bottom.
Why the other options are wrong:
1, 2: the black part has a pointed (arrow) top, not a notch.
4: the lower white part is pointed/crossed, not a mirror image.
5: colours are reversed (white top, black bottom).
Cetking shortcut: Reverse-check: in B the black half is on top — so only figures with a black top (1–4) survive; then match the notch.
Answer: C
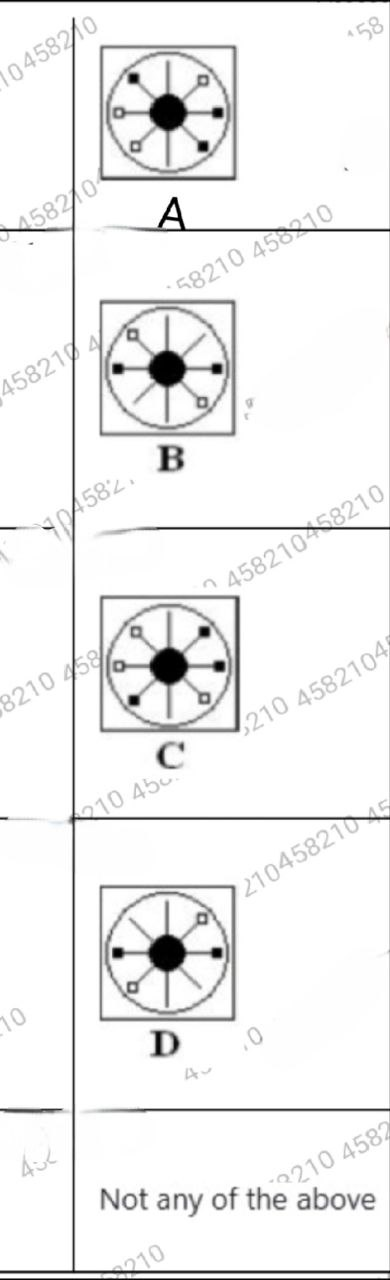
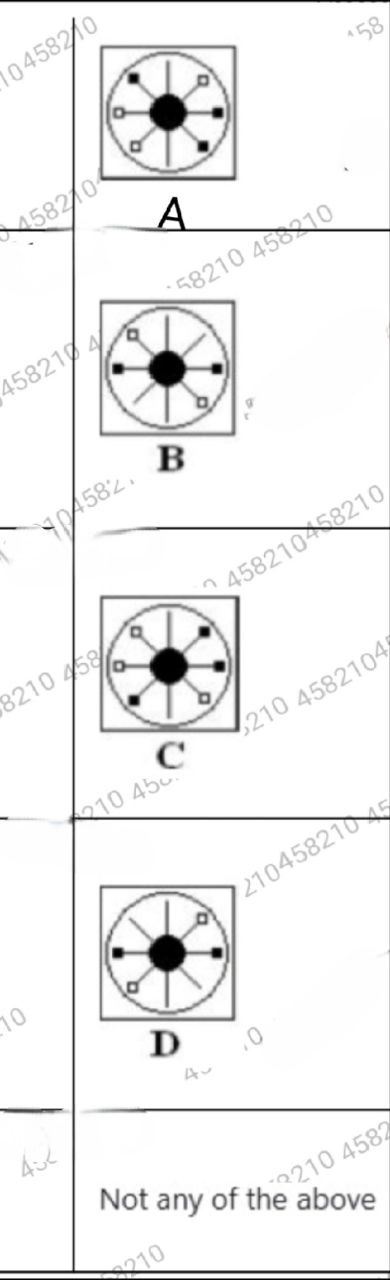
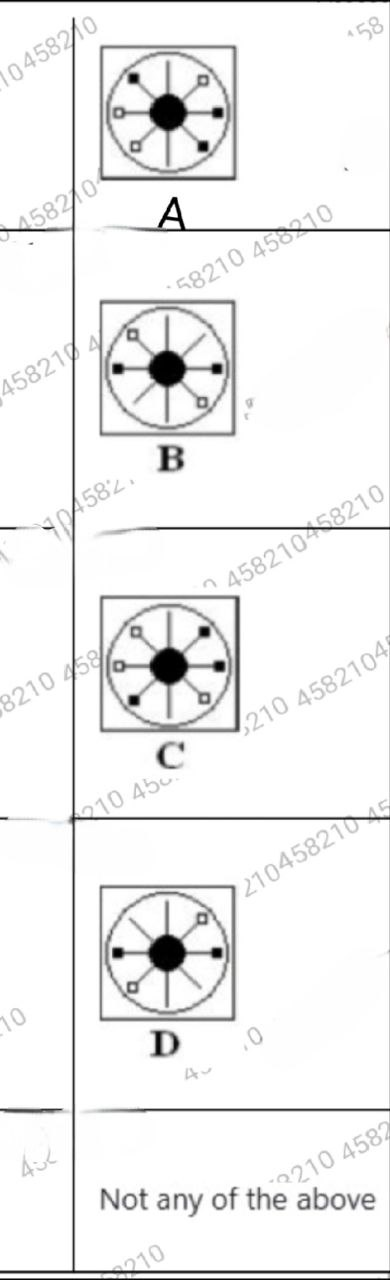
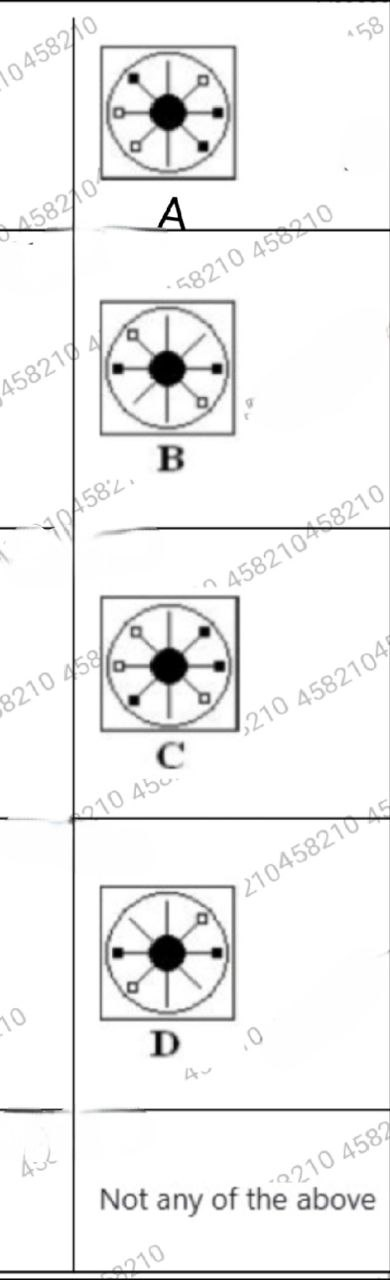
Which figure completes the statement?
- A
- B
- C
- D
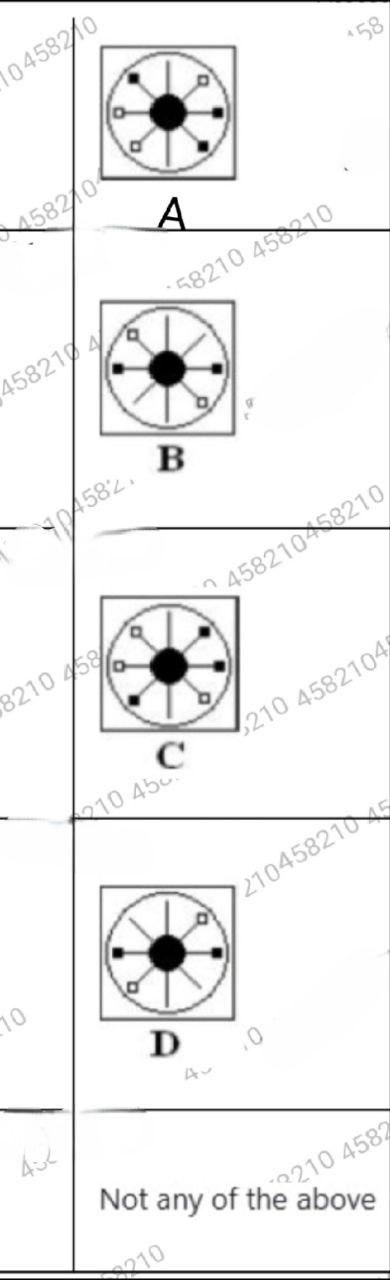
- E
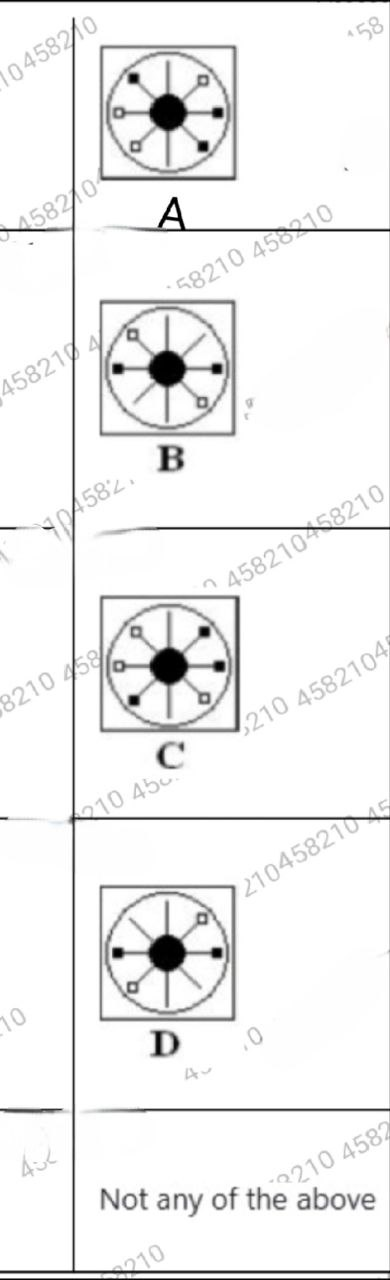
Show answerHide answer
Answer: D
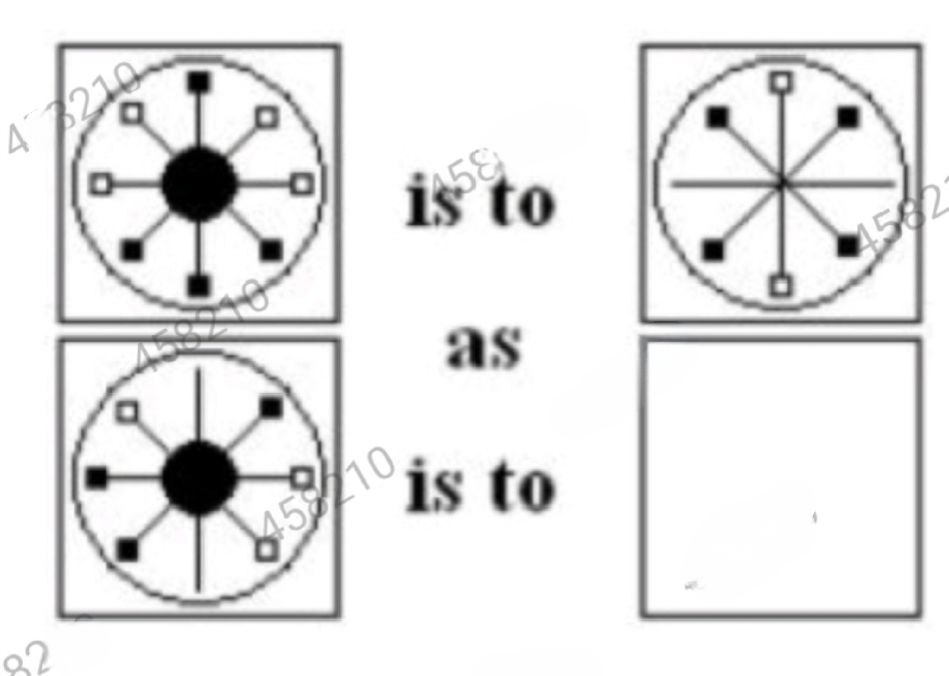
Approach: Figure analogy — each pair of opposite spokes changes by a fixed shading rule.
Solution: Compare opposite ends of each spoke in Fig 1 and Fig 2:
one shaded + one unshaded → both shaded;
both shaded → both unshaded;
both unshaded → squares removed.
Apply to Fig 3: NE–SW both shaded → both unshaded; E–W one each → both shaded; NW–SE both unshaded → removed; N–S has no squares → stays a plain line.
Option D shows exactly this.
Why the other options are wrong: A, B and C do not follow the shading rule on at least one spoke; E — a matching figure exists.
Cetking shortcut: Work spoke-pair by spoke-pair, not square by square.
Answer: D
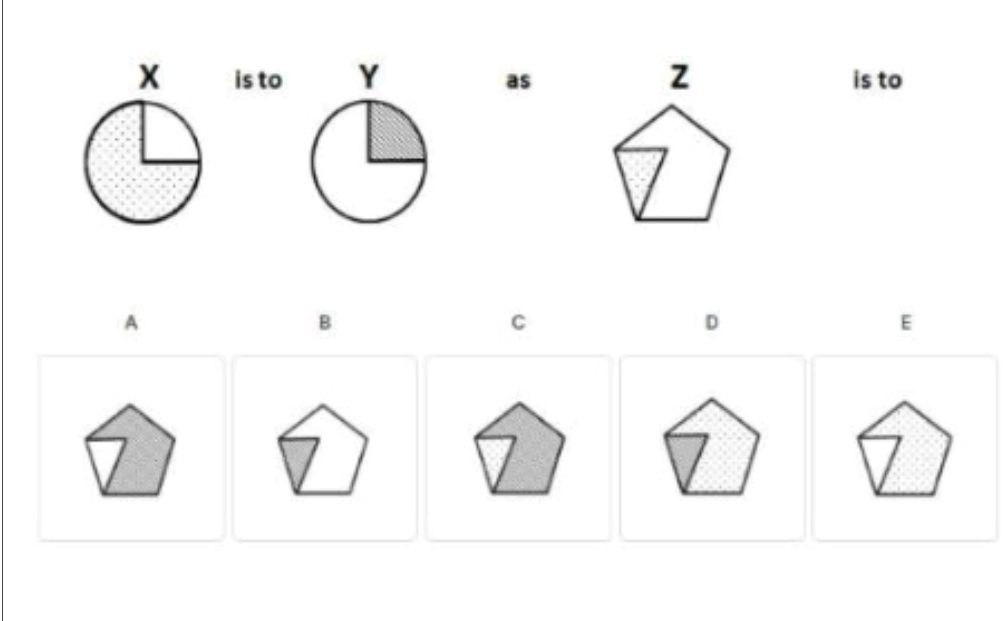
Which option completes the sequence best?
- AA
- BB
- CC
- DD
- EE
Show answerHide answer
Answer: A
Approach: Figure analogy: colour swap rule.
Solution: X → Y: the dotted (large) part becomes plain white and the plain white (small) part becomes shaded grey.
Apply to Z: the dotted small triangle becomes white, and the plain white pentagon body becomes grey.
Option A: white triangle, grey pentagon body.
Why the other options are wrong:
B – body stays white, triangle grey (reverse).
C – triangle still dotted.
D, E – body dotted, not grey.
Cetking shortcut: State the rule as 'dotted → white, white → grey' before looking at options.
Answer: A
Following question consists of two sets of figures.
Figures (A, B, C and D) constitute the Problem Set.
Figures (1, 2, 3, 4 and 5) constitute the Answer Set.
There is a definite relationship between figures A and B.
Establish a similar relationship between figures C and D by selecting a suitable figure from the Answer Set that would replace the question mark (?) in figure D.
- A
 (Answer Figure 1)
 - B
 (Answer Figure 2)
 - C
 (Answer Figure 3)
 - D
 (Answer Figure 4)
 - E
 (Answer Figure 5)
Show answerHide answer
Answer: E
Approach: Figure analogy: apply the A → B change to C, one element at a time.
Solution:
A → B: both shapes are cut to half their width (square → narrow rectangle, big square → tall rectangle), and the inner element appears as a solid black dot.
C → D: both triangles are halved down the middle, giving a small right triangle and a tall right triangle, with a solid black dot inside the tall one.
Figure 5 shows exactly this: a small right triangle and a tall right triangle with a black dot.
Why the other options are wrong:
1: a plus-shape, a different family of shapes.
2: circles, not halved triangles.
3: right triangles, but the inner dot is a hollow circle, not solid black as in B.
4: an open L-shape, not a closed triangle.
Cetking shortcut: Halving is the main change. Of the options, only 3 and 5 halve the triangle, and the solid dot of B points to 5.
Answer: E
Following question consists of two sets of figures.
Figures (A, B, C and D) constitute the Problem Set.
Figures (1, 2, 3, 4 and 5) constitute the Answer Set.
There is a definite relationship between figures A and B.
Establish a similar relationship between figures C and D by selecting a suitable figure from the Answer Set that would replace the question mark (?) in figure D.
- A
 (Answer Figure 1)
 - B
 (Answer Figure 2)
 - C
 (Answer Figure 3)
 - D
 (Answer Figure 4)
 - E
 (Answer Figure 5)
Show answerHide answer
Answer: C
Approach: Figure analogy: in A → B, each matching pair of parts joins into one closed shape.
Solution:
A → B: the two small squares become one small square (top-right). The V and the inverted V join into a diamond. The two side curves ) ( join into a lens lying flat at the bottom.
C → D: the two small circles become one small circle (top-right). The U and the inverted U (∩) join into a closed rounded oval. The two side bars with semicircle bumps join into one horizontal line with a circle in the middle, at the bottom.
Figure 3 has an oval, a small circle at top-right, and a horizontal line with a circle at the bottom.
Why the other options are wrong:
1: the bottom element is an X-like crossing, not a line with a circle.
2: has no line-with-circle element, and the oval is nested inside a lens.
4: keeps the side bars separate (no merging).
5: has a double line with concentric circles, which adds extra parts.
Cetking shortcut: Count parts: each pair in C must become one part in D, so D must have exactly 3 parts.
Answer: C
The following question, a related pair of figures (unnumbered) is followed by five other figures marked 1, 2, 3, 4 and 5. Out of the five numbered pairs, select the pair that has a relationship similar to that in the unnumbered pair.
- A
 (Answer Figure 1)
 - B
 (Answer Figure 2)
 - C
 (Answer Figure 3)
 - D
 (Answer Figure 4)
 - E
 (Answer Figure 5)
Show answerHide answer
Answer: A
Approach: Figure analogy (pair): find how figure II is made from figure I, then test each pair.
Solution:
In the given pair, figure II is figure I turned through 180°. The square moves from top to bottom, and the arrow at the bottom-right pointing up moves to the top-left pointing down.
Pair 1: the flag at the top-left with the Z-line, turned through 180°, gives the flag at the bottom-right, as shown. ✔
Why the other options are wrong:
2: figure II is a top-to-bottom flip (water image), not a 180° turn. The dot stays on the same side.
3: figure II is a flip; the arrow keeps pointing right instead of reversing.
4: figure II is a left-right mirror image (5 → 2-like).
5: the S-curve is flipped, not turned.
Cetking shortcut: To tell a turn from a flip, watch one marked element. In a 180° turn it moves to the diagonally opposite corner and points the opposite way.
Answer: A
The following question, a related pair of figures (unnumbered) is followed by five other figures marked 1, 2, 3, 4 and 5. Out of the five numbered pairs, select the pair that has a relationship similar to that in the unnumbered pair.
- A
 (Answer Figure 1)
 - B
 (Answer Figure 2)
 - C
 (Answer Figure 3)
 - D
 (Answer Figure 4)
 - E
 (Answer Figure 5)
Show answerHide answer
Answer: A
Approach: Figure analogy (pair): the number of sectors in the circle sets the number of sides of the polygon.
Solution:
Given pair: a circle cut into 4 sectors (2 lines) → a triangle (3 sides). So sides = sectors − 1.
Pair 1: a circle cut into 6 sectors (3 lines) → a pentagon (5 sides) = 6 − 1. ✔
Why the other options are wrong:
2: a triangle → a circle, which reverses the type of figure.
3: 8 sectors → a square (4 sides). It should be 7 sides.
4: 6 sectors → a hexagon (6 sides). It should be 5.
5: a decorated circle → a diamond (4 sides); the count does not fit.
Cetking shortcut: Count the sectors in figure I and subtract 1. Only the pentagon fits (6 − 1 = 5).
Answer: A
The following question, a related pair of figures (unnumbered) is followed by five other figures marked 1, 2, 3, 4 and 5. Out of the five numbered pairs, select the pair that has a relationship similar to that in the unnumbered pair.
- A
 (Answer Figure 1)
 - B
 (Answer Figure 2)
 - C
 (Answer Figure 3)
 - D
 (Answer Figure 4)
 - E
 (Answer Figure 5)
Show answerHide answer
Answer: E
Approach: Figure analogy (pair): track each element (semicircle, shaded quarter, arrow, dot) from I to II.
Solution:
Given pair: the semicircle on the left becomes a semicircle on top. The black quarter stays at the top-left. The arrow pointing right becomes a stem pointing down, and its head is reversed into a fork (tail). The dot stays at the lower right.
This is a reflection across the top-left to bottom-right diagonal, plus reversing the arrowhead.
Pair 5: the top semicircle (black at the top-right) becomes a left semicircle (black at the bottom-left). The down-arrow becomes a line to the right ending in a fork. The dot stays at the lower right. Every element follows the rule. ✔
Why the other options are wrong:
1: the black part ends up on the wrong side of the bowl (a turn, not the given reflection).
2: the rectangle's shading is reversed (white-black-white becomes black-white-black). In the given pair the shading never changes.
3: the semicircle moves to the right, not to the left.
4: the small square's shading changes (filled → hollow) and an extra mark appears.
Cetking shortcut: Check the shading first. In the given pair the shaded part keeps its look, so any pair whose shading changes (2, 4) is out at once.
Answer: E
In the following question, a related pair of figures (unnumbered) is followed by five other pairs of figures numbered as (a), (b), (c), (d), and (e). Out of the five numbered pairs, select the pair that has a relationship similar to that in the unnumbered pair.
- AOption 1
- BOption 2
- COption 3
- DOption 4
- EOption 5
Show answerHide answer
Answer: B
Approach: Break the change from figure I to figure II into rotation, colour and arrow changes.
Solution:
Given pair: the half-circle on the left moves to the top and the arrow on the right moves to the bottom (a 90° clockwise turn); the black and white parts swap; the arrowhead becomes an arrow tail.
Pair 2: the striped bar on the right moves to the bottom, the tail on the left becomes an arrowhead on top (90° clockwise turn + head/tail swap), and the bar's white-black-white becomes black-white-black (colours swap).
Pair 2 follows all three changes.
Answer: B
In the following question, a related pair of figures (unnumbered) is followed by five other pairs of figures marked as (a), (b), (c), (d), and (e). Out of the five, select the pair that has a relationship similar to that in the unnumbered pair.
- AOption 1
- BOption 2
- COption 3
- DOption 4
- EOption 5
Show answerHide answer
Answer: A
Approach: Relate the number of parts in the circle to the number of sides of the second figure.
Solution:
Given pair: circle divided into 4 parts → triangle (3 sides), i.e. sides = parts − 1.
Pair 1: circle divided into 6 parts → pentagon (5 sides) ✓.
Pair 3: 8 parts → square ✗ (needs 7 sides). Pair 4: 6 parts → hexagon ✗ (needs 5). Pair 2: triangle → circle ✗. Pair 5: decorated circle → square ✗.
Answer: A
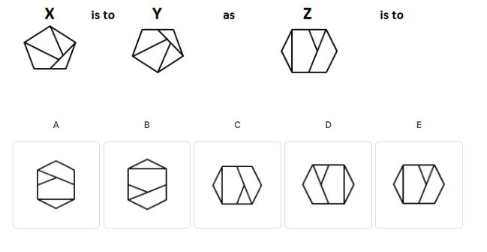
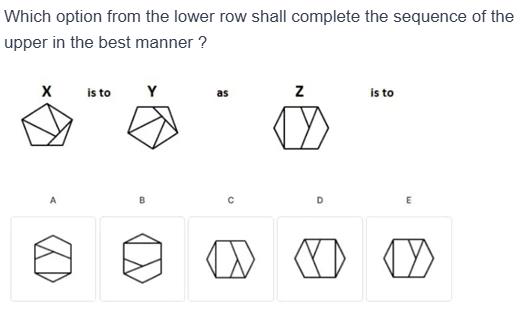
Which option from the lower row shall complete the sequence of the upper in the best manner?
- AOption A
- BOption B
- COption C
- DOption D
- EOption E
Show answerHide answer
Answer: C
Approach: Find how X becomes Y, then apply the same change to Z.
Solution:
Y is X turned upside down: the pentagon's point moves from the top to the bottom and the inner lines flip top-to-bottom with it.
Apply the same top-to-bottom flip to Z: the hexagon outline is unchanged, the vertical line stays on the left, and the Y-shaped pair of lines becomes an inverted Y (two lines meeting at the bottom).
Option C shows this.
Why the other options are wrong:
A, B: the hexagon has been turned 90°.
D: the inner lines are rearranged, not flipped.
E: identical to Z — no change applied.
Answer: C
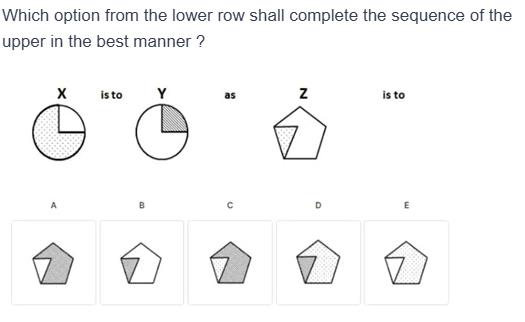
Which option from the lower row shall complete the sequence of the upper in the best manner ?
- AA
- BB
- CC
- DD
- EE
Show answerHide answer
Answer: A
Approach: Shading swap: X → Y turns the dotted region plain and the plain region line-shaded.
Solution:
In X the large sector is dotted and the quarter is plain; in Y the large sector is plain and the quarter is shaded.
Rule: dotted → plain, plain → shaded.
In Z the small triangle is dotted and the rest of the pentagon is plain → triangle plain, rest shaded = option A.
Why the other options are wrong:
B: triangle shaded, rest plain – rule reversed.
C: triangle still dotted.
D: triangle shaded, rest dotted.
E: rest dotted instead of shaded.
Cetking shortcut: Apply one change at a time: first find what the dotted part becomes, then the plain part.
Answer: A
Which option from the lower row shall complete the sequence of the upper in the best manner ?
- AA
- BB
- CC
- DD
- EE
Show answerHide answer
Answer: C
Approach: X → Y is a water image (flip top-to-bottom); apply the same flip to Z.
Solution:
In X the small triangle is at the bottom-right; in Y it is at the top-right → left/right stay, top/bottom swap = water image.
Z: vertical line on the left, a 'Y'-shaped pair of lines on the right with the fork at the top.
Water image of Z: vertical line still on the left, fork now at the bottom (inverted Y) → option C.
Why the other options are wrong:
A / B: hexagon turned to a different orientation.
D: vertical line moved to the right (that is a 180° rotation/mirror).
E: identical to Z – no change.
Cetking shortcut: To separate water image from 180° rotation, check whether a left-side feature stays on the left.
Answer: C